Friday, 28 July 2023

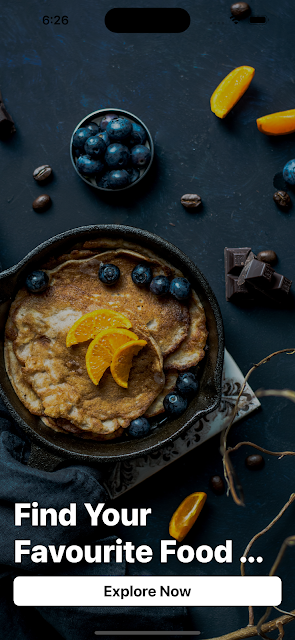
REACT NATIVE ImageBackground Example

 Day-3

import React, {Component} from 'react';
import {
View,
SafeAreaView,
TouchableOpacity,
ImageBackground,
Text,
StyleSheet,
} from 'react-native';

// create a component
const IntroScreen = () => {
return (
<View style={styles.container}>

{/* Background view */}
<ImageBackground
resizeMode="cover"
style={styles.imageContainer}
source={require('../../assets/bg_image_1.jpeg')}>

<View style={{flex: 1, backgroundColor: 'black', opacity: 0.3}} />

</ImageBackground>

{/* Front view */}
<View style={styles.bottomContainer}>
<View>
<Text style={styles.findText}>Find your Favourite food ...</Text>

<TouchableOpacity style={styles.buttonExplore}>

<Text style={styles.explore}>Explore Now</Text>

</TouchableOpacity>
</View>
</View>
</View>
);
};

// define your styles
const styles = StyleSheet.create({
container: {
flex: 1,
justifyContent: 'center',
alignItems: 'center',
backgroundColor: '#2c3e50',
},

imageContainer: {
flex: 1,
width: '100%',
height: '100%',
},

explore: {
color: 'black',
fontSize: 20,
fontWeight: '700',
},

buttonExplore: {
padding: 8,
backgroundColor: 'white',
borderRadius: 8,
alignItems: 'center',
marginTop: 10,
},

findText: {
color: 'white',
fontWeight: '800',
fontSize: 40,
textTransform: 'capitalize',
},

bottomContainer: {
position: 'absolute',
height: '100%',
zIndex: 2,
width: '100%',
justifyContent: 'flex-end',
paddingHorizontal: 20,
paddingBottom: 50,
},
});

//make this component available to the app
export default IntroScreen;

Screenshots


REACT NATIVE - Flat List using axios and useEffect and api integration

 Day 3 

import React, {useState, useEffect} from 'react';
import axios from 'axios';

import {
View,
Image,
FlatList,
StyleSheet,
SafeAreaView,
Text,
StatusBar,
ActivityIndicator,
Platform,
} from 'react-native';

// create a component
const ProductsGridView = () => {
const [data, setData] = useState([]);
const [loading, setLoading] = useState(false);

useEffect(() => {
axios
.get('https://fakestoreapi.com/products')
.then(res => {
setData(res.data);
setLoading(true);
})
.catch(err => {
setLoading(true);
});
}, []);

if (loading) {
return (
<SafeAreaView style={styles.container}>
<Text
style={{
fontSize: 18,
padding: 10,
justifyContent: 'center',
alignItems: 'center',
}}>
Products List
</Text>

<FlatList
data={data}
renderItem={({item}) => (
<View style={styles.card}>
<Image
resizeMode="contain"
style={styles.imageThumbnail}
source={{uri: item.image}}
/>
<Text style={styles.title}>{item.title}</Text>

<Text style={styles.price}>{'$ ' + item.price}</Text>
</View>
)}
//Setting the number of column
numColumns={2}
keyExtractor={(item, index) => index.toString()}
/>
</SafeAreaView>
);
} else {
return (
<SafeAreaView style={styles.container}>
<ActivityIndicator size="large" />
</SafeAreaView>
);
}
};

// define your styles
const styles = StyleSheet.create({
container: {
flex: 1,
marginTop: StatusBar.marginTop || 0,
},

title: {
fontSize: 16,
marginTop: 10,
},

price: {
fontWeight: '600',
fontSize: 17,
marginTop: 10,
},

card: {
flex: 1,
elevation: 3,
margin: 5,
padding: 10,
backgroundColor: 'white',
borderRadius: 1,
elevation: 2,
shadowColor: 'grey',
shadowOpacity: 0.25,
shadowOffset: {width: 0, height: 2},
shadowRadius: 8,
overflow: Platform.OS === 'android' ? 'hidden' : 'visible',
},
imageThumbnail: {
justifyContent: 'center',
alignItems: 'center',
height: 150,
padding: 2,
margin: 5,
},
});

//make this component available to the app
export default ProductsGridView;


Screenshot


REACT NATIVE - Simple Flat List with Grid

 //import liraries

import React, {Component} from 'react';
import {View, Image,FlatList, StyleSheet, SafeAreaView,StatusBar} from 'react-native';


const DATA=
[{"id":"4eh","url":"https://cdn2.thecatapi.com/images/4eh.jpg","width":720,"height":540},{"id":"7i1","url":"https://cdn2.thecatapi.com/images/7i1.jpg","width":600,"height":900},{"id":"9oo","url":"https://cdn2.thecatapi.com/images/9oo.jpg","width":537,"height":720},{"id":"9ss","url":"https://cdn2.thecatapi.com/images/9ss.jpg","width":600,"height":897},{"id":"bi2","url":"https://cdn2.thecatapi.com/images/bi2.jpg","width":500,"height":666},{"id":"bjr","url":"https://cdn2.thecatapi.com/images/bjr.jpg","width":375,"height":500},{"id":"chc","url":"https://cdn2.thecatapi.com/images/chc.gif","width":500,"height":417},{"id":"ddp","url":"https://cdn2.thecatapi.com/images/ddp.jpg","width":612,"height":612},{"id":"MTkwMTQ2OQ","url":"https://cdn2.thecatapi.com/images/MTkwMTQ2OQ.jpg","width":819,"height":1024},{"id":"MjAyMTk2MQ","url":"https://cdn2.thecatapi.com/images/MjAyMTk2MQ.jpg","width":1200,"height":800}];


// create a component
const ImageFlatList = () => {
//const [dataSource, setDataSource] = useState(DATA);

return (
<SafeAreaView style={styles.container}>
<FlatList
data={DATA}
renderItem={({item}) => (
<View
style={{
flex: 1,
flexDirection: 'column',
margin: 1,
}}>
<Image style={styles.imageThumbnail} source={{uri: item.url}} />
</View>
)}
//Setting the number of column
numColumns={2}
keyExtractor={(item, index) => index.toString()}
/>
</SafeAreaView>
);
};

// define your styles
const styles = StyleSheet.create({
container: {
flex: 1,
marginTop: StatusBar.marginTop || 0,
},
imageThumbnail: {
justifyContent: 'center',
alignItems: 'center',
height: 200,
padding:1,
margin:2
},
});

//make this component available to the app
export default ImageFlatList;


Screenshot


REACT NATIVE - Simple Static ListView

 //import liraries

// Day 2 - Learning

import React, {Component} from 'react';
import {
View,
Text,
StyleSheet,
StatusBar,
FlatList,
SafeAreaView,
Pressable,
} from 'react-native';

const DATA = [
{
id: '1',
title: 'First Item',
},
{
id: '2',
title: 'Second Item',
},
{
id: '3',
title: 'Third Item',
},
{
id: '4',
title: 'Forth Item',
},
{
id: '5',
title: 'Fifth Item',
},

{
id: '6',
title: 'Sixth Item',
},


{
id: '7',
title: 'Seven Item',
},

];

const ListItemView = ({title}) => (
<Pressable
onPress={() => {
console.log('press - '+title);
}}>
<View style={styles.item}>
<Text style={styles.title}>{title}</Text>
</View>
</Pressable>
);

// create a component
const SimpleList_1 = () => {
return (
<SafeAreaView style={styles.container}>
<FlatList
data={DATA}
renderItem={({item}) => <ListItemView title={item.title} />}
keyExtractor={item => item.id}
/>
</SafeAreaView>
);
};

// define your styles
const styles = StyleSheet.create({
container: {
flex: 1,
marginTop: StatusBar.marginTop || 0,
},

item: {
backgroundColor: '#F5F5F5',
marginVertical: 5,
padding: 15,
marginHorizontal: 10,
},
title: {
fontSize: 14,
},
});

//make this component available to the app
export default SimpleList_1;

Screenshot


Thursday, 27 July 2023

REACT NATIVE - Simple Login Screen

// Day 2 Learning

//import liraries
import React, {Component, useState} from 'react';
import {
View,
TouchableOpacity,
Text,
TextInput,
StyleSheet,
} from 'react-native';

// create a component
const LoginScreen1 = () => {
const [email, setEmail] = useState('');
const [password, setPassword] = useState('');
const handleSubmitPress = () => {
console.log(email + ' -- ' + password);
};

return (
<View style={styles.container}>
<Text
style={{
fontSize: 30,

textAlign: 'center',
}}>
Welcome back
</Text>
<TextInput
placeholder="Email"
placeholderTextColor="#010101"
onChangeText={text => {
//console.log(text)
setEmail(text);
}}
style={styles.input}
/>

<TextInput
placeholder="Password"
placeholderTextColor="#010101"
secureTextEntry={true}
onChangeText={text => {
//console.log(text)
setPassword(text);
}}
style={styles.input}
/>

<TouchableOpacity onPress={handleSubmitPress} style={styles.submitButton}>
<Text style={styles.submitButtonText}> Login </Text>
</TouchableOpacity>
</View>
);
};

// define your styles
const styles = StyleSheet.create({
safeAreacontainer: {
flex: 1,
},
container: {
flex: 1,
paddingTop: 30,
justifyContent: 'center',
},

input: {
backgroundColor: '#F4F4F5',
margin: 15,
height: 48,
borderColor: 'transparent',
borderWidth: 1,
padding: 10,
},

submitButton: {
backgroundColor: '#057AFF',
padding: 10,
margin: 15,
height: 40,

alignItems: 'center',
},
submitButtonText: {
color: 'white',
fontWeight: 'bold',
justifyContent: 'center',
},
});

//make this component available to the app
export default LoginScreen1;

 Screenshot


REACT NATIVE - SIMPLE LAYOUT DESIGN- 1


 import React from 'react';

import {View, StyleSheet, SafeAreaView} from 'react-native';

// create a component
const App = () => {
return (
<SafeAreaView style={styles.safeAreacontainer}>
<View style={styles.mainContainer}>
<View style={styles.box1} />
<View style={styles.box2} />
<View style={styles.box3} />
</View>
</SafeAreaView>
);
};

// define your styles
const styles = StyleSheet.create({
safeAreacontainer: {
flex: 1,
},

mainContainer: {
flex: 1,
flexDirection: 'column',
},

box1: {
flex: 1,
backgroundColor: '#4C6663',
},

box2: {
flex: 8,
backgroundColor: '#C9D7F8',
},

box3: {
flex: 1,
backgroundColor: '#7D4767',
},
});

//make this component available to the app
export default App;


Thursday, 11 May 2023

Login Screen using SwiftUI


Simple Login Screen using SwiftUI 

===========================


//

//  LoginScreen.swift

//  iOSApp1

//

//  Created by Pratap Kumar on 04/05/23.

//


import SwiftUI


struct LoginScreen: View {


    @State var username : String = "";

    @State var email : String = "";

    @State var password :String = "";


    var colorBlue: Color = Color.blue

    var grayBackground: Color = Color.gray.opacity(0.1)


    @State private var showingAlert = false


    var body: some View {


            VStack{


                // Welcome Label

                Text("Welcome, User")

                    .foregroundColor(colorBlue)

                    .padding(.bottom, 30).font(.largeTitle)


                // Email Address Field

                HStack{

                    Image(systemName:"envelope.fill").foregroundColor(Color.blue)

                              TextField("Email Address", text: $email)

                }.padding().background(grayBackground).cornerRadius(5.0).padding(.bottom,10)


                // Password Field

                HStack{

                    Image(systemName:"lock.fill").foregroundColor(Color.blue)

                    SecureField("Password", text: $password)

                }.padding().background(grayBackground).cornerRadius(5.0).padding(.bottom,10)


                Button(action: {

                    showingAlert = true

                }){

                    Text("Login")

                        .font(.headline)

                     .foregroundColor(.white)

                     .padding()

                     .frame(width: 150, height: 50)

                     .background(colorBlue)

                     .cornerRadius(10.0)

                } .alert(isPresented: $showingAlert) {

                    Alert(title: Text("Login Details"),

                          message: Text("Email : \(email)\nPassword : \(password)"),

                          primaryButton: .destructive(Text("OK")),

                          secondaryButton: .cancel(Text("Cancel")))

                }


            }.padding(.horizontal)

        }

    }


struct LoginScreen_Previews: PreviewProvider {

    static var previews: some View {

        LoginScreen()

    }

}


Screenshot

============